Showing posts with label baking. Show all posts

Friday, November 24, 2017

~My Apple Pie~

Happy Thanksgiving!!!

Yes, I know the actual date was yesterday... I spent it with my family and some friends (mostly people I didn't know), but I didn't have to cook!! I'm always so excited for the holidays because I have an excuse to cook all the amazing dishes that normally I wouldn't prepare. So....we decided to celebrate today, just us. I enjoyed myself cooking all morning and sharing a delicious meal with my loves, really feeling thankful for ALL that God has done for me, especially the gift of my husband and children.

I want to share with you my Apple Pie. It is my favorite pie to make and to eat. I've recently discovered a website that inspires me a lot. All the pictures are amazing and the recipes too!! I made the pie crust following THE BUTTER HALF 's recipe.. easy and delicious!

This is what I did:

~APPLE PIE~

crust:
3 cups flour
1 tbsp sugar
2 sticks unsalted butter, cold and cut in cubes
1/2 cup ice water
1 beaten egg (for brushing)

filling:
3 large apples
1 lemon (zest and juice)
2 tbsp cornstarch
1/2 cup brown sugar

  •  Mix butter, sugar and flour in a food processor (or in a mixer using the leaf attachment) trying to be quick, not to let the butter melt. When it's all crumbled, add the iced cold water. Mix rapidly until it sticks together. Form two balls and let them rest in the fridge.
  • In the meantime peel the apples, take out the core and slice them very finely. Put them in a bowl mixing the rest of the filling ingredients.
  • Roll the dough for the bottom part of the pie and cover a 9 inch pie pan (grease the pan before laying the dough). Poke the bottom with a fork, add the apple filling.
  • With the second ball of dough you can use your imagination. You could just roll it thinly to perfectly cover the top and give it a rustic, old-fashioned look, or you can be creative a make your own design. 
  • Brush the top of the pie with the beaten egg.
  • Cook for 35 minutes in preheated oven at 345 degrees or until golden and beautiful.
As you can see from my pictures below, I cut 4 wide strips of dough and a few decorative flowers with a cookie cutter. You can find "pie crust cutters" HERE .


Let me know if you try this recipe! I would love to see how you decide to decorate your crust. 

Ciao for now.
xoxo,


Wednesday, April 19, 2017

Madeleines Cookie Recipe

Bonjour!!!
Yes, this is the proper way to start this blog-post as today I'm going to share with you one of my signature recipes.... the Madeleines Cookies, those delicious French little pastries, or soft cookies; I love them so much and they are a big success every time I have guests.
I made them this morning and I took pictures to give you a step-by-step photo-recipe. Are you ready?

Here it is!


Recipe for 12 cookies

INGREDIENTS
  • 2 EGGS
  • 2 tbsp SUGAR
  • 2 tbsp POWDER SUGAR
  • 1 tsp VANILLA EXTRACT
  • 1 tsp ALMOND EXTRACT
  • 1/4 cup SELF-RAISING FLOUR
  • 1/4 cup regular FLOUR
  • 6 tbsp BUTTER
  • 1 tbsp HOT WATER
  • extra powder sugar for dusting


Mix eggs, both sugars and extracts until smooth.

 
Add both flours, sifted together, and keep mixing.

 Melt the butter and slowly add it to the batter, also the water.

 
Pour the batter into a Madeleines` pan. After having carefully buttered and floured it.

 
Cook in preheated oven at 400 F degrees for 10 minutes.


You will see that a little dome will form on top of the cookie...that's a perfect result! They are so good with a cup of tea or coffee. The only indispensable tool is the Madeleines' pan, if you don't have one you can find it here:


Let me know how they come out!!!

xoxo,


This recipe is my own and as an amazon affiliate, I will receive a small commission if you click and buy from my links. Thank you!

Wednesday, April 12, 2017

My Ricotta Cake

Goodmorning!!
it's Spring Break and my children are all home. They are still all asleep, I was able to wake-up early to sip my big cup of caffe'-latte while reading the news and catching-up on my instagram feed, I love checking everybody's pictures and new posts, it gives me a lot of inspiration.
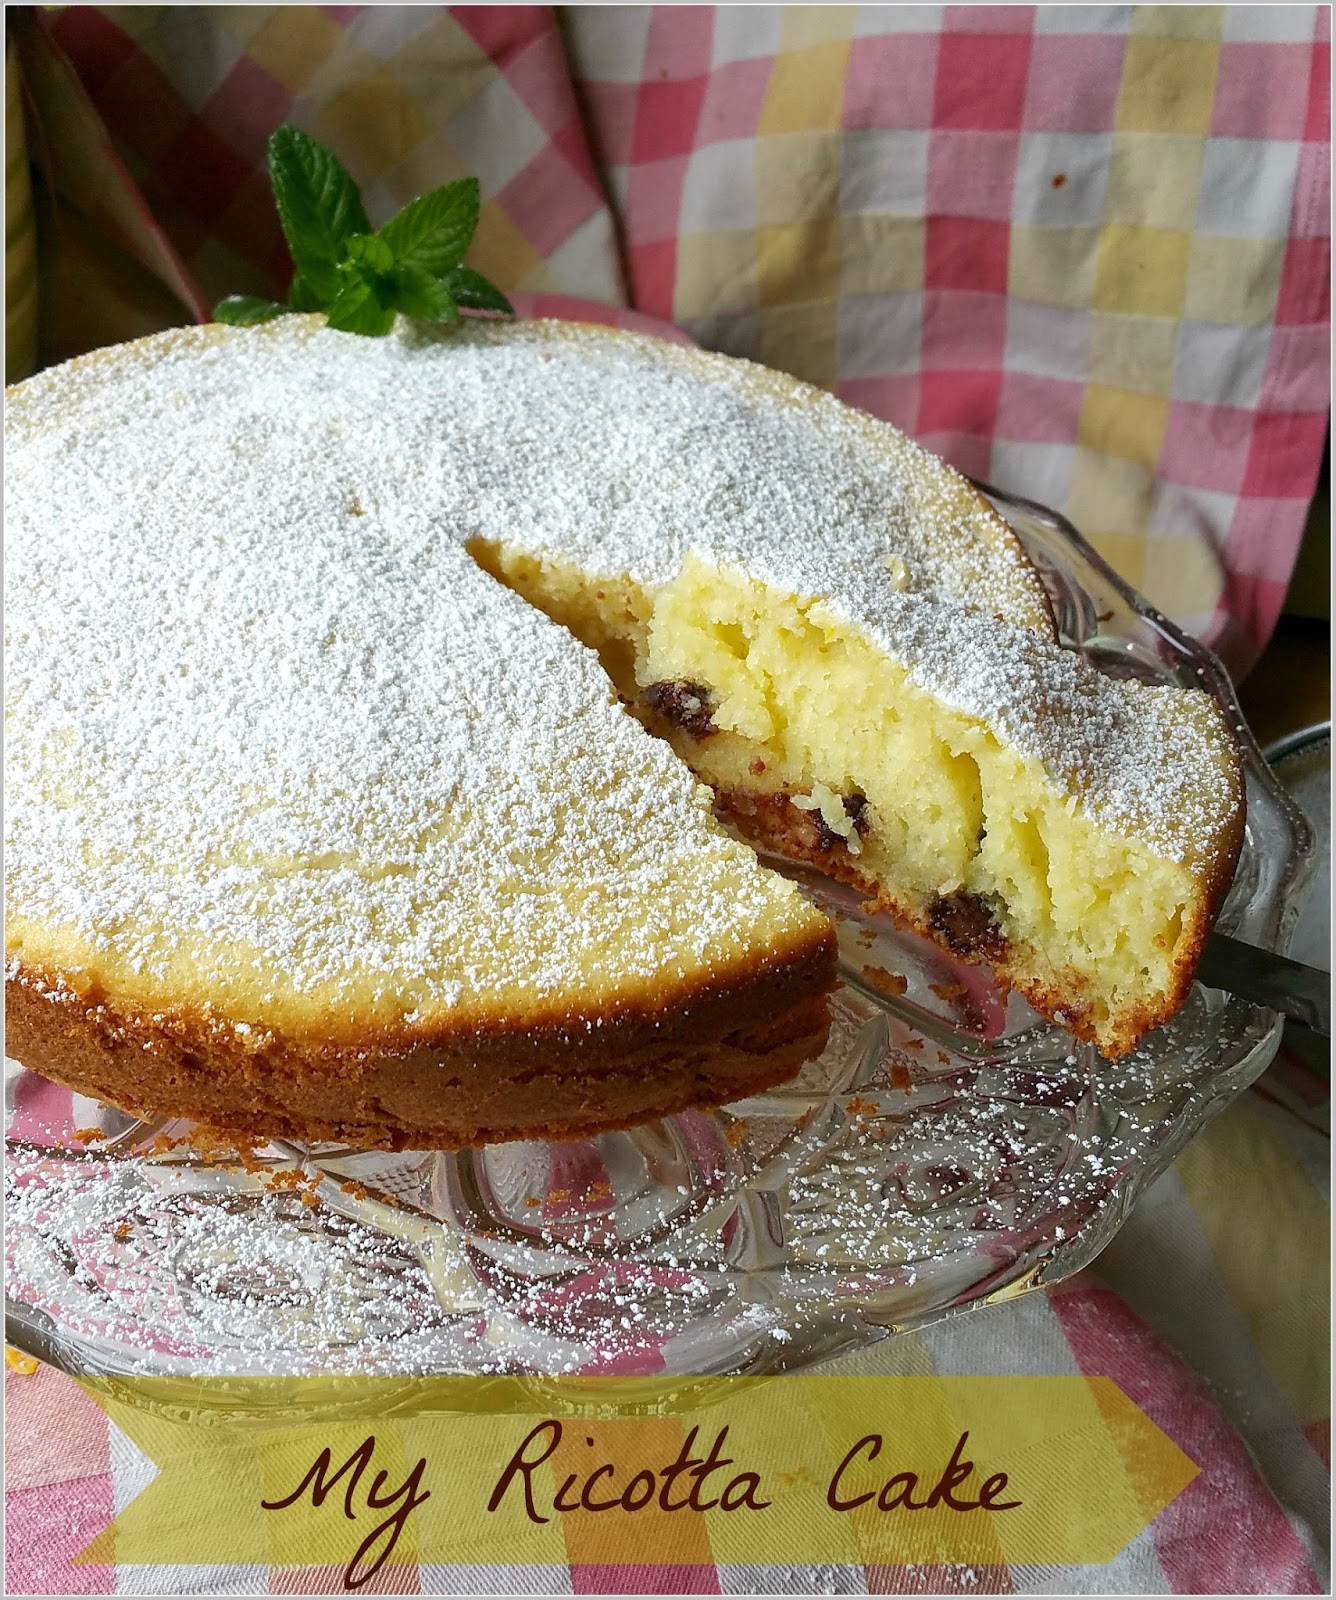
So, in this time of peace and calm I'll take advantage to share with you a delicious cake I made a few days ago. In Italy it's a classic: the Ricotta Cake. I used to make it all the time, then somehow I forgot about it, maybe because here in the States I never eat ricotta, as it's very different from the one I was used to eat. I saw a recipe online and I suddenly remembered the taste and how soft and tender that cake was. I had to make it!! I adapted the recipe to my taste and memories.
Here it is.

MY RICOTTA CAKE


Ingredients:

  • 3 EGGS (whites and yolks separated)
  • 1 cup of SUGAR
  • 7 tbsp of BUTTER (melted)
  • 1 cup of RICOTTA
  • 1 cup of FLOUR
  • 1 tsp of BAKING POWDER
  • LEMON ZEST (1 lemon)
  • 1 cup of CHOCOLATE CHIPS (semi-sweet)
  • POWDER SUGAR for dusting
  1. Beat the egg yolks with the sugar until fluffy and pale yellow. 
  2. Add the ricotta and keep mixing until smooth and the melted butter.
  3. Sift-in the flour together with the baking powder.
  4. Beat the egg whites until firm and gently add them to the batter, mixing softly, making sure they don't get flat.
  5. Gently mix-in also the lemon zest and at last the chocolate chips.
  6. Grease and flour dust a cake pan (9 inches), add the batter and put in preheated oven at 350 F degrees for 30-35 minutes. (Always insert a tooth-pick in the cake to check if it's well cooked. If it comes out clean, it means the cake is done). 
  7. Dust your cake with powder sugar and serve.
It's a very simple recipe and you'll see how good it is!! Everyone will love it! My children were a little skeptical at first but they ate it all! I hope you'll enjoy it as well.

xoxo,


Friday, March 31, 2017

Lemon Bundt Cake Recipe ~ Ciambellone recipe

Hello Everyone!!!

I noticed it has been a while since I have shared a recipe on this blog. I cook a lot everyday, of course I need to feed my five children and husband, but I mostly do it because I love it. Yes, I cook lunch and dinner....and "merenda" everyday. Merenda is the Italian word for "snack-time", you know, the little snack children need after school. I usually bake a cake. The one I want to share with you is from a recipe I learned last year from a very good friend. It's called "ciambellone" {pron. CHAM-BELL-OH-NAY}...meaning "big donut". It's absolutely not a donut, it just has the same shape. :) Here it is:


CIAMBELLONE recipe {or LEMON BUNDT CAKE}

Ingredients:
  • 1 -1/4 cup of SUGAR
  • 3 EGGS
  • 1/2 cup of VEGETABLE OIL
  • 1 cup MILK
  • 1-1/4 cup of  FLOUR
  • 1 LEMON (zest + juice)
  • 1 tsp BAKING POWDER

  1. Mix well the eggs with the sugar until fluffy.
  2. Add slowly the oil, the flour, baking powder and milk.
  3. Grate the zest of the lemon, then add its juice.
  4. Pour the batter in a greased bundt cake mold.
  5. Cook in oven at 180 degrees for 30 minutes. 

Please enjoy!!! My family loves it, it's usually all gone quickly. Let me know if you make it and how it comes out!! 


xoxo,


Thursday, March 9, 2017

~Love For Cooking ~ a review

Hello everyone!!!

Those that have been following me for a while already know how much I love cooking. I shared a few of my recipes and I will share more!! I like to cook all kinds of food, but mostly Italian, of course. One of my grandmas was an amazing cook, I learned a lot from her as well as many other people in my life. 

One of the most important things about cooking is using the right tools. My favorite are the classic wooden spoons, I use them for everything, stirring, mixing, whipping.... but I have to say that I recently fell in love with a gorgeous spatula from Tovolo. It has a silicone top and the handle is made of wood {maybe that's why I like it so much!}. The design is really cute, on one side there's a tree of hearts, on the other side it says LOVE. I had entered a giveaway during Valentine's Day on their Facebook page and I had the luck to be one of the winners!

I already used it many times and I have to say that it works perfectly. When I mix a batter I noticed that the top doesn't bend like many other spatulas I've used before, it remains firm and scrapes the bowl clean. Also the size is good, it's bigger than a normal size wooden spoon, but it has a comfortable grip. I cannot deny I'm very happy with it. 

You can find the exact same one on Amazon for a great price! Just click here:  Tovolo Spatulart Love Tree Spatula There's a big variety of colors and sizes. I had never tried this brand before, how about you? Have you tried Tovolo? You'll fall in love.


xoxo,

~This blog post is affiliated with Amazon, if you click and purchase from one of my links I will receive a small percentage of the purchase. Everything written here is according to my opinion.~


Sunday, February 5, 2017

~Banana chocolate-chip muffins~

Hello everyone!!!
today is Sunday and that's when we usually have a little extra time to make something special for our kids, or just for ourselves.. ;) One of the things of everyday life I really enjoy is cooking. I recently found a delicious recipe that is perfect for an afternoon snack or even breakfast. I'm talking about Banana Chocolate-chip muffins! They are perfect especially when you have a couple of bananas getting darker and darker on your kitchen counter... how many times that happens in my house....... well, if that's the case, look for a couple extra ingredients and make these!! You won't be disappointed.

BANANA CHOCOLATE-CHIP MUFFINS 
(ingredients for 12 medium muffins)


  • 3 ripe BANANAS, mashed
  • 3/4 cup SUGAR
  • 1 EGG
  • 1/3 cup BUTTER, melted
  • 1 1/2 cups self-rising FLOUR
  • 1 cup of CHOCOLATE-CHIPS
Mix sugar and egg to the mashed bananas. Add melted butter (you can use margarine if you prefer). Add the flour (if you don't have the self-rising kind, just use the regular flour + 1 tsp of baking powder) and mix well. Add chocolate-chips at last folding them in the batter.
Pour the batter into muffin molds and bake at 375 degrees for 15-20 minutes. I check if they are cooked inserting a tooth-pick in one of the muffins, if it comes out clean it means they are ready!!


I hope you like them!! Enjoy them with a cup of coffee or tea! Let me know what you think.

xoxo,


Tuesday, April 14, 2015

Rustico ~ a delicious recipe from my town.


Hello Hello!!!
I have been asked to write the recipe of this delicious treat. I have published it on my Recipe Blog... but it's in Italian {here is the LINK, if you are interested}. I'm translating here the recipe in English for all those who would like to try it without using google translate... because who knows what would come out!!! :))
If like me, you use the frozen puff-pastry it will be very simple. Here we go:

INGREDIENTS
  • 2 sheets of frozen PUFF-PASTRY
Bechamelle Sauce
  • 2 cups of warm MILK
  • half stick of BUTTER
  • 3 tbsp of FLOUR
  • SALT
  • PEPPER
extra ingredients for the filling
  • a can of PEELED TOMATOES
  • 1 cup of FRESH MOZZARELLA
  • 1 EGG
  1. Thaw the puff-pastry.
  2. Prepare the bechamelle sauce:melt the butter in a small pan on medium heat. When melted add the flour. Mix well, always stirring. Add the milk very slowly, always stirring, until it becomes a cream. Add salt and pepper. 
  3. Every rustico is formed by 2 discs of puff-pastry (diameter of 5-6 inches), you can also make it square... any shape you like.
  4. Put a dollop of bechamelle in the center of the first disc, add 3 chunks of mozzarella and one or two well squeezed can tomatoes. Add a pinch of salt.
  5. Beat the egg to use it as a "glue" to attach the two puff-pastry discs together. Brush the edges of the first disc and close the rustico covering the filling with the second disc, pressing well the edges to form kind of a dome on top.
  6. Brush the whole surface with the rest of the egg-wash.
  7. Use the rest of the puff-pastry and ingredients to make 2 or 3 more rusticos.
  8. Bake in pre-heated oven at 400 degrees for 30 minutes.

Well, that's all!!! I hope you like it... and if you make it... please let me know!!!!! :)
 
xoxo,

Wednesday, December 12, 2012

Peppermint Cupcakes!

So much going on in these days!!!!! We are looking for a new house, as we need to move out from the one we live in... we don't have much time. I hope to find it tomorrow and move-in in two days!! Am I asking too much?? :) I've also been busy {not too busy unfortunately} with some orders in the shop, thing that always makes me very happy.. Then the kids going to school, home-works, different meetings.... so.. what to do in this type of situation?? You know what I like to do.... BAKE!!!! It takes the stress out of me, I enjoy baking and I love the results.. he he ;) especially in the recipe that I will share with you today.
I was reading one of my favorite blogs, The Freckled Fox , when I saw the recipe of Peppermint Cupcakes!
At first I thought it sounded kinda weird, I couldn't imagine how the combination of flavors such as mint and cream-cheese could go well together, then I kept on reading and I was suddenly inspired and convinced by the gorgeous Emily {author of the blog}. I went to buy all the ingredients I needed and I started baking!
They came out so pretty....and so delicious!!! You won't believe your taste buds!!!


This cupcake is for sure a perfect treat for Christmas! The taste of the minty candy-cane makes it really special. I know you want to try it now.. so go get the recipe in Emily's blog!! You can find it HERE , it's very simple and fast to make. You won't be deceived.
Happy Baking!!!!!

xoxo, 


Thursday, October 25, 2012

yumminess for my palate :)


I wish you were all in my house to smell the delicious Pumpkin Muffins that just came out of my oven! :) The whole house {it's very tiny..but still...} is filled with pumpkin and cinnamon aroma. 
The recipe was very easy, I found it a few days ago in a very nice blog. I know you want to make them and taste the sweetness of the cream-cheese filling squirting out of the pumpkin soft cake.. You can find the recipe HERE. And don't forget to thank Laurie and visit her wonderful blog!
I hope you are all enjoying the beautiful Fall season and having a yummi snack as well!!


 ..ready to go in the oven..

a little peek..


YUM.

What is in your oven? Do you have a good recipe to share? Please do!! :)

xoxo,


Sunday, September 23, 2012

Longing for Fall


Is it really FALL? It sure doesn’t feel like it here in California. This morning it was a little cloudy and the air was fresh.. almost chilly.. but just after a few hours.. back to the normal 90 degrees!! Disappointed smile
Well, I baked all day anyways… {my husband not too happy about it, ‘cause the oven makes our little house SOOO hot!}… a yummi baked pasta for lunch and cupcake brownies for merenda {aka snack} accompanied by my Cappuccino. I took a picture to show the beautiful coasters I recently won in a Giveaway. Look at them!! They were made by Heather Rains, a sweet girl from California who writes about her life in her wonderful BLOG. Aren’t they sweet? I love the retro flower design…
coasters.jpg
caffe.jpg
A few days ago I won another giveaway… it’s so much fun and I feel so blessed to receive little gifts from all over the place!! Every time it happens I think it’s a present from Heaven to bright up my day.
I’m also happy to tell you that I’m giving away another COZY from my shop. You will be able to pick the one you like the most! If you’re interested.. go check out the awesomeness  of  this GIVEAWAY.. on Kristine’s Blog!! You’ll love all the prizes…
Well, it’s getting late and my chores are calling me… I want to finish this post with a beautiful quote from St. Padre Pio of Pietrelcina, one of my favorite Saints. {Today we celebrate His feast}. And also a beautiful picture of what Fall should normally look like…. =)

"Oh, how precious time is! Blessed are those who know how to make good use of it. Oh, if only all could understand how precious time is, undoubtedly everyone would do his best to spend it in a praiseworthy manner! (PADRE PIO)

I wish you all a beautiful week!
Nature-In-Autumn8
xoxo,
firma
Follow my blog with Bloglovin